


4 Tips for Enhancing Your Bird Watching Experience Using Pulsar Thermal Imaging Devices
If you’re new to thermal imaging and you’re wondering how it can be of use for bird watching, we’ve compiled a short list of tips to help you make the most of your device and see with clarity in those more challenging situations any bird watcher will know all to well.
As you’ll know, birds are often found in trees, ground cover, grass, or reeds — making them, at times, incredibly difficult to spot. But they also emit heat, which means a thermal imager will make locating them easier than ever; gone are the days of scanning endlessly with glass!
A thermal imager uses heat, not light, to detect an animal or object; penetrating the shadows and dense foliage as though they weren’t even there and making short work of a bird’s cryptic camouflage while it’s at it. And what’s more, it’ll achieve its goal in both daylight and total darkness. Even so, there are still some limitations. Similar to a camera, they won’t see through solid matter, and your own understanding of habitats or a bird’s behaviour is still your most valuable tool. Thermal imaging devices are designed to aid in the detection process, cutting down on the time spent searching for a bird and allowing you more time to capture stunning images, which means thermal is not intended to replace your trusted glass optics.
The top-end Telos XL50 (as seen in our video) is more than suitable in this instance. Its large 1024×768 thermal sensor achieves exceptional image detail and its wide 14° field of view provides an expansive viewing area, cutting down on the need to scan around. The Telos XQ35, the entry level model in the Telos series, is more affordable, provides a slightly larger magnification range, and is more than capable of detecting smaller heat sources, but its smaller 384×288 thermal sensor means images are not as clear and, at 10.7°, its field of view is narrower.
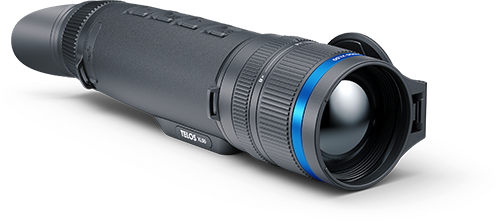
Pulsar Telos XL50
Thermal Imaging Monocular
When it comes to choosing the thermal imaging device that is best for a bird watcher’s applications, you want to opt for a model with a larger sensor and a wide field of view — birds are relatively small heat sources and this will reduce the need to scan around.
The top-end Telos XL50 (as seen in our video) is more than suitable in this instance. Its large 1024×768 thermal sensor achieves exceptional image detail and its wide 14° field of view provides an expansive viewing area, cutting down on the need to scan around. The Telos XQ35, the entry level model in the Telos series, is more affordable, provides a slightly larger magnification range, and is more than capable of detecting smaller heat sources, but its smaller 384×288 thermal sensor means images are not as clear and, at 10.7°, its field of view is narrower.
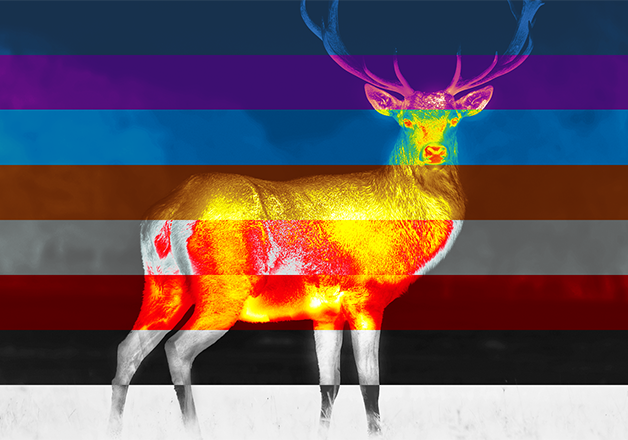
Regardless of which device you are using, however, we recommend employing the following tips to enhance your thermal observation experience. We’ll use a particularly difficult scenario — a tree in full leaf on a bright, sunny day — as our example. You can hear a blackbird but you can’t spot it. Looking through the thermal will reveal the blackbird hidden in the shadows and foliage of our tree. However, an expanse of cold sky between the trees poses a challenge to a thermal imaging device, making it harder to differentiate between our blackbird and the myriad temperature differences in the tree. Here’s how we get around this:
Switching Between Colour Palettes:
Switching between palettes is the first thing we recommend trying. It’s the quickest and easiest way to check whether what you are looking at is a bird or just foliage rustling in the breeze. Colour palettes are included to allow you to adapt to ever-changing lighting and environmental conditions. Each colour palette uses different shades and colours to depict differences in temperature. Some palettes will define a warm body better than others, whilst some are used to emphasize the mid-tones of your observed habitat. Cycling through your colour palettes is the easiest way to ascertain whether what you are looking at is an animal or just a bit of sunshine reflected off a leaf. If you have cycled through these colour palettes and are still unsure of what you are looking at, try…
Adjusting the Focus:
Simple as it may sound, merely adjusting the thermal imaging device’s focus may help. As there is depth to our tree, adjusting the focus will allow you to see into its different areas and may help to paint a better picture of what you are looking at. It is possible that the blackbird could be obscured by leaves. You could wait for the bird to move, or better still, you could move position and adjust that focus again, penetrating deeper into the leaves and possibly revealing what you couldn’t see from your original position. In this instance, let’s say you have spotted something moving in the tree. It is clear to you that this is an animal and not foliage, but you’re struggling to ascertain exactly what it is. This brings us onto our next tip.
Adjusting Brightness and Contrast Settings:
Each thermal device will allow you to change the brightness and contrast levels in order to achieve a clear picture in all kinds of scenarios, just like adjusting the exposure on a traditional camera. In our hypothetical, dropping the brightness down and increasing the contrast will provide a clearer image and a better understanding of what you are looking at. Similar to switching through the colour palettes, adjusting these settings will allow you to find a “sweet spot” that could even help you ascertain where and what the heat source you’ve detected is.
Adjust the Sensor Amplification Level:
Pulsar thermal imaging devices provide three sensor amplification levels: Normal, High, and Ultra. These amplification levels use a set of algorithms to enhance the device’s detection and recognition capabilities in varying weather conditions. As a general rule of thumb, setting the amplification level to the current conditions should be the first thing you do.
It is worth noting what conditions Pulsar recommends each amplification level for:
- Normal – Best for use in near-perfect conditions, e.g. a clear, dry day, where thermal contrast is good.
- High – Best for use in humid days with some moisture in the air, where a thermal imaging device may struggle to differentiate between heat sources due to some infrared radiation being lost.
- Ultra – Best for use in adverse weather conditions with very low contrast, such as heavy rainfall or dense fog.
Our final piece of advice is to make your way through these amplification modes, adjusting the brightness and contrast levels as you go, until you find what works best for you. Adjust the settings for all three amplification levels and then scan your eye over your scene as you cycle through them; there’s a high likelihood that you’ll find really helps to draw your eye to the bird. To optimise the image even further, activate the smoothing filter in the device’s main menu.
Read more…
Then & Now: How the Pulsar Axion Series Has Evolved
Pocket-sized & Powerful: Why the Axion Compact is a Must Have for Birdwatching

7 Reasons to Choose the Pulsar Merger LRF XT50 for Bird Watching

Small but Mighty: Reviewing the Axion Compact Series

Uncompromising Image Quality: Pulsar Merger LRF XT50

4 Tips for Enhancing Bird Watching with Pulsar Thermal Imaging Devices

Made in Europe: Why is it Important and Should it Matter to You?

NETD vs. sNETD: Understanding the Terminology

Pro Tips for Capturing Stunning Wildlife Footage
